British Sherman Tactics – 101

With FlamesCon coming up in about a month my army is going to have its first intensive gaming weekend, so in preparation I’ve been thinking a bit about how the various parts will worth together on the battlefield. It should come as no surprise that the key unit(s) in the army all have Sherman (or Firefly) tanks!

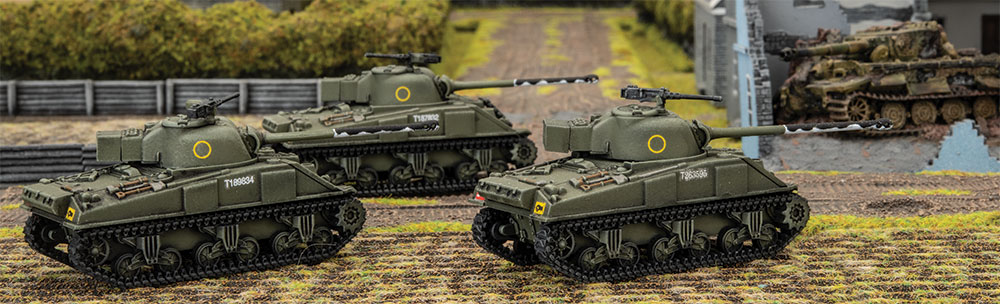
I’ve decided to maximise my number of Firefly tanks and their precious tank-busting 17pdr guns by taking four platoons of minimum strength Sherman Platoons, each with 2 Sherman tanks, and a single Firefly. Between these platoons and my M10 platoon, this gives me a good number of specialist tank killers that can be spread around the table.

If there is a downside to the Firefly (and M10) is that their 17pdr guns, whilst excellent at killing tanks, are not as good at killing infantry teams thanks to the “No HE” rule – A weapon with No HE targeting an Infantry or Gun Team, adds +1 to the score needed To Hit. This means it is important to keep some of the 75mm armed Sherman tanks around in case you run in to a dug-in infantry platoon, or anti-tank gun line, defending an objective.

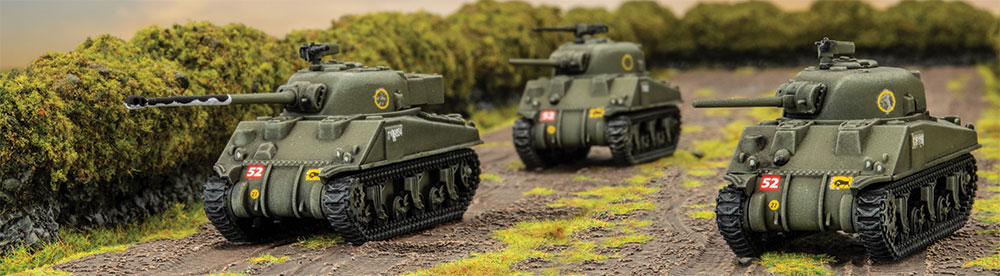
My intention is to ensure that the M10s and (depending on the opponent) two platoons of Shermans are working together to attack an objective, or blunt an enemy armoured thrust. This gives me 10-12 tanks (if I include the HQ) working together with a mix of guns. This should be able to overcome most opposition forces.

One of the tactics that has crossed my mind, but I am not convinced is a good idea, is leaving the Firefly tanks behind as the Shermans advance on the objective. This means that they can provide covering fire without a loss of rate of fire, assuming they do not move. On paper this sounds good, but it does mean that the Shermans (and therefore the Firefly that is in the platoon) can find themselves not in Good Spirits if either of them are destroyed or bailed out. All it would take is for one Sherman to be bailed and not get back in, and then the Firefly and remaining Sherman will run for the hills. Maybe I will keep this tactic in reserve if I need it and let you know how it works out for me.

Alpha Strike or Firefight

I’ve included Stuarts in my army because, one they are cheap machine-gun carrier that can knock out small tanks, and two, the wonderful Spearhead rule. Spearhead will (in certain missions) let me significantly expand my deployment area and allow me to put a lot of tanks, close to the enemy in preparation for first turn rush. I am confident I can pack in most (if not all) of my Shermans inside the 8” bubble.

If I choose not to use the extra space for a rush, I can also use it to ensure my tanks are in a good defensive position in turn 1, potentially allowing them to be concealed and gone-to-ground.

Smoke ‘Em If You Got ‘Em

One of the tactics that I am terrible at remembering to use is… Smoke! I tend to think about killing the enemy, rather than making their life more difficult. Why lob a Smoke round across the table when you can drop High Explosive on someones head? With the Shermans relatively average armour, placing a 16” / 40cm long smoke screen across the table can shield them for one valuable turn as they push up, or isolate part of the battlefield. This would be especially useful if I am planning on running head first in to an enemy gun line, or stopping a second line of defensive troops from shooting me up if I am more than 6” / 15cm away.

The worst outcome is that it forces the enemy to move, dropping their rate of fire and potentially exposing them to my other models.

There you have it, my basic plan for how the army will work. It is going to be fun to see if my armchair generalship will transfer to the tabletop – perhaps I had better arrange a game in the next couple of weeks with Wayne or Victor just to be safe.

~Chris

Time For A Cup Of Tea, and British Tank Markings

I’ve mentioned this in the past, but one of the things that I think really makes my British army pop on the tabletop (and in photos) is the use of decals. I always feel that the application of decals to a tank is that final step that really helps to make a difference – much like good basing on infantry.

I am quite lucky as the British army went to great lengths to mark their tanks, from Divisional, Regiment and Squadron Markings, to Bridge Weights and Serial Numbers, and of course Allied Stars. With so many options I found most vehicles having around 10-or-so markings for me to apply.

First things first, what are all the decals on the Late War British Decal Sheet? Casey has written a great article (which I have relied on heavily and you absolutely should read) but if you want the basic TLDR (Too Long, Didn’t Read) version here you go…

Looking at the tanks below you can see where I have chosen to apply the decals.

One of the things I learnt whilst doing a little reading through our guides on the website and Colours Of War, is that there was a “mandated” way to apply the markings.

Of course, this doesn’t always match up with what happens in real life as crews will often find ingenious places to put stowage or extra armour, which necessitates the moving of markings. Sometimes they just don’t want a great big white star on the side of the tank as a target for enemy gunners, and sometimes they just don’t get the memo. This means you can either follow the guides on the site like a definitive list, which is perfectly fine, or use a bit of artistic license (which is what I did).

If you don’t have a lot of experience adding decals to models, give it a go, they really make a huge difference. If you want to know more about how to do it, then check out Blake’s guide on our YouTube channel here…

~Chris


Painting Winter Whitewash.

I’ll start out by saying that this is not the fastest method to paint Whitewash, but to me the outcome is worth the time and effort.

At the start of this project I thought it would be a good chance to challenge everything I’ve ever assumed about painting Soviets, starting with the base colour.

As an experiment took some spare IS-2 hull tops and painted them in some different Tamiya greens to give me a set of colour swatches:
1. XF13 JA Green
2. XF67 NATO Green
3. XF58 Olive Green
4. 50% XF13 JA Green, 50% XF88 Dark Yellow.

Click on the image to the right for a bigger version…

I then gave these a wash of GW Athonian Camoshade, which is basically a dark green wash. The main reason for using this rather than a black wash is that a black wash desaturated the colour a bit to much.

My favorite colour here was number 4, the 50% XF13 JA Green, 50% XF88 Dark Yellow. If I was going to be painting my tanks Green I’d use this colour, but since the tanks are going to be whitewashed the NATO Green is close enough and it means I didn’t have to add in an extra step to mix up a batch of base paint.

With the base green chosen its time to move onto the whitewash. I’ve had limited success with painting whitewash in the past, so these early steps are simple building on that experience. There are a lot of steps here, and while some of them could probably be left out, I feel that since the paints are semi-opaque it all adds to the overall effect and helps achieve a good depth of colour.

Step 1. Basecoat with Tamiya NATO Green, then, using an airbrush, panel fade with Deck Tan. This is basically dirty off-white that makes a good undercoat for white.

Step 2. Wash with Athonian Camoshade. This adds some of the rich green back onto the tank and adds contrast into the panel lines.

Step 3. Panel fade again with Deck Tan, but not quite as much as the first layer.

Step 4. Panel fade with White. I made this layer of paint quite patchy to let the previous layers of paint show through.

Step 5. I give the tank a coat of X35 Tamiya Semi-gloss clear to prep the tank for pin washing. A lot of people use a gloss varnish instead, but I like the Tamiya Semi-gloss clear as its basically a clear paint that gives the pinwash and streaking effects something to key into, while still protecting the paint beneath.

I then panel faded and did some streaking with a dark green oil wash.

Step 6. I do a bit of sponge chipping with Vallejo Camo Olive Green.

Step 7a. The next thing to work on is some streaking. The first layer of streaking is to represent general dirt. I start by applying single dots of Dark Streaking Grime.

Step 7b. I let the Streaking Grime dry for a few minutes then work it with a brush and white spirits to feather it a bit.

Step 8a & 8b. I repeat step 7a and 7b with a rusty colour. This step is to simulate a brighter rust streak effect. With all of the streaking effects don’t be afraid to add it to some of the flat surfaces where water would pool and corrode the metal.

Step 9a. This is where the real magic happens. Using some white oil paint I dabbed spots all over the tank, concentrating on the flat surfaces and upper parts of the vertical surfaces.

Step 9b. After letting the paint dry for a few minutes I start working the oil paint into the top surfaces and streaking it down the vertical surfaces with a brush dampened with white spirits.

Below is a bit of a time lapse montage to give you an idea of how this works.

Overall, I know that this is a long convoluted process, but I’m all about quality over quantity at the moment (the complete opposite to Soviets), and I’m actually quite enjoying the process, despite getting hassled by the rest of the Big Four about my painting speed.

~Casey

Red Steel Rising

It’s taken a while, but I’ve finally finished my first platoon.

As I said one of my previous posts, I’ve decided to tackle my own personal white whale – a winter washed army. I’m really happy with the results (despite the rest of the Big Four painting 100 points in the same time) and I think that it sets a really good standard for me to keep whilst I work on the rest of my army.

For me though its all about the journey, and I don’t mind spending a lot of time on a few models.

I had a lot of fun painting these and learnt a lot, which should make painting the rest of the army faster.

I’ve put together a painting guide for how I completed the whole whitewash effect and will post it up later this week.

The next platoon on my painting table will be some T-70s.

~ Casey

Thunder In The Skies

My American army is growing nicely and I have a few unit options now for list building. To add something new to the arsenal I decided to complete some air support; a pair of P-47 Thunderbolts!

As with most historical painting projects I tackle, I first spend a lot of time in Google image search. I hadn’t looked into American WW2 aircraft much before, and only really had the Flames Of War box cover examples to go by. I wanted to see what else was out there, and found quite a few examples with a simple yellow canard and not many other markings.

I liked the bare metal look which made these a nice break from painting olive drab vehicles.

I did however learn that the anti reflective strip down the top of the fuselage was sometimes olive drab instead of black, so this was a nice way of tying them in to the rest of my force.

I’ve never used aircraft in a game before so I’m looking forward to trying them out and seeing if they can help me deal with those pesky Tigers!

– Victor

Step-By-Step British Painting Guide

Over the past couple of months I have had a few requests on our Instagram for a step-by-step painting or colour guide for how I painted my British armour. The steps are all fairly straight forward. The key was spending a little time trialing colours and talking about the process with the rest of the team, looking for their thoughts on how to achieve a fast, but striking looking army.

Step 1: I primed the model Black, and then airbrushed my base colour, Tamiya Dark Green 2, over the whole model. I took time to make sure that I applied a couple of light coats first, building up the colour over the black, and focusing on certain areas where I wanted the coverage to be opaque, and therefore brighter.Step 2: I then gave the model an overall drybrush with Colours Of War Firefly Green. I wasn’t trying to  completely cover the base coat, but rather highlight all the raised points and edges. The difference in colour between the two steps is quite striking however.Step 3 should really be two steps…

Step 3a: I tidied up the tracks by painting black over any areas that were accidentally drybrushed in the previous step, then painted them with a mix of Vallejo Black Grey and Oily Steel. I also picked out the chain (with just Oily Steel) on the side of the hull, and spare tracks.Step 3b: Next I airbrushed the entire model with a Gloss Varnish. This seals in all the work I had done up to this point and protects it during the Oil Wash. I normally create my own wash using artists oil paints and some white spirits. This is carefully applied in any recesses and along panel lines. Using a Q-tip or Cotton Bud I cleaned up any excess.

Step 4: Next I carefully applied some Gloss Varnish to the areas I was going to decal. Once the decals were applied I used a little Micro Sol (Decal Setting Solution)  just to help them look painted on. Once these completely dried I then gave the whole model a very light drybrush of Iraqi Sand, just to give some subtle edge highlights and add a little dust to the whole model.I hope that this has been useful, it is a really straight forward process that was quite quick to apply.

~Chris

Basing Your Troops

During some of my Instagram posts for Big Four Of Late-war a couple people asked about basing, so I thought I’d put together a basic basing guide. It is all pretty simple stuff, nothing fancy going on, I’ll leave that for Victor.

You can click on any of the images below for larger versions

Some preliminary notes
First off I will point out that I like to paint my miniatures before I do the basing as I find it easier to paint the miniatures lightly glued (usually with PVA) to card. This makes it easier to paint each individual miniature without the team base getting in the way. All paints are Vallejo Model Color unless stated.

Step 1
Once I’ve painting my miniatures, I paint the round base the same base colour I plan to use for my earth base colour, in this case German Camo Medium Brown (826). I then glue them into the holes on the bases, bearing in mind where any guns may go etc. I like to do this without glue first to try different arrangements out. If it is a gun team like my Nebelwerfer example, having an assembled gun available to help with the arrangement of the crew is a good idea. Once you are happy with your arrangement glue in your miniatures. For hard plastic (like my panzergrenadiers) you can use plastic glue (poly cement), but for the flexible plastic (like the Nebelwerfer crew) use super glue. Also remember to fill in any unused holes with the plastic discs that come with your bases.

Step 2
There will be a few gaps around where the bases fit into the holes. I fill these with pre-mixed interior filler. The kind of stuff you get from the hardware store for filling gaps in drywall etc. I work this around with an old paint brush. These products are usually water soluble so you can wet your brush to make it easier to push around. I also use it to add a bit more texture to the surface of the base and generally blend the miniature bases in with the rest of the base.

Step 3 (image #3 above)
After the filler is dry (it dries pretty fast, no more than an hour or so) I then spread some PVA glue in patches on the base. On top of this I sprinkle sand and other various sizes of grit. You could even add a few large stones (though keep in mind the scale of your miniatures) depending on the look you are going for. Once the glue is dry, brush off the excess loose bits with a large brush.

Step 4
Once you are sure your sand and grit is dry you can paint the base whatever earth colour you have gone for. Here I’ve used German Camo Medium Brown (826). Don’t worry too much about the base edge as you can touch that up at the end.

Step 5
Now you can give your texture a drybrush to bring out its earthy detail. I’ve put two layers of drybrushing on. First with US Field Drab Earth (873), then Cork Brown (843).

Step 6
Once the paint is dry it is time for some vegetation. I’m using a mix of two types of tufts (these are available from great a many manufacturers these days) and some static grass I mixed up myself from about three different colours. Colour is up to you, but I go for tufts and static grass that complement each other.

First I spread on some PVA glue with a brush in irregular patches.

Step 7
Then I place the tufts in position on the glue patches, before I sprinkle/dump on the static grass. Once the static grass is heaped on I press it down a bit with a brush handle. I then leave it to dry. I give this a good length of time, depending on the weather (the colder it is the longer the PVA takes to dry). Once it is dry I brush off the excess static grass into its container.
It is worth keeping in mind where you will place guns as you don’t what a particularly large tuft getting in the way of where you want your gun to go.

With infantry this is usually where you finish.

Step 8
However, if you are basing a gun team you will still have to attach your guns. Some people like to just place their guns on the base so they can change type of gun. I don’t. I like to glue mine down. I just put a spot of PVA on the points that will touch the base, like the bottom of the wheels and the end of the trails. Depending on how fluffy your flocking is you may have to apply some weight to the gun so the glue holds. With the Nebelwerfers I just rested my metal pin vice along the trail until the glue was dry.

Step 9
Another item you may have to add to a gun team is ammunition, be it unfired rounds, spent cases, or ammunition crates. These all look great and many gun kits already come with these items. Just paint them up at the same time you paint your guns. I just glue these down with PVA like I do with the guns.

Finally once all the glue is dry give the whole team a spray with a can of matt varnish. This takes the shine off the tufts and static grass, and ensures your ground texture is nice and matt.

I hope that gives you an idea about how I go about my basing.

Happy basing,

~Wayne

Div Arty, All In!

When working on my 105mm Howitzers I wanted to give them a lot of spent shells to show they’ve been busy!

Here’s how I did it.

I decided to use plasticard rod as it’s easy to cut to the length I need. You could instead use brass rod. This would have advantage of being the right colour so wouldn’t require painting, but the downside is it’s a lot harder to cut (especially when doing a lot of shells!) and the cuts will often need to be filed smooth.

I used the loader figure that comes with the guns to approximate the thickness of the rod I’d need, and how long to make them. You could be extra expert and convert the real world measurements to 1/100!

To make them easy to paint, I mounted them to a popsicle stick with double sided tape. This holds them fairly well along as you don’t go too heavy with the brush work.

To paint them I brushed on black primer (but you could spray them) and then did two coats of Vallejo Brass.

Once dry I removed them from the mounting, and painted the end that was stuck down with black, to emulate the hollow end of a spent shell. I also went around the edge with brass again.

All that’s left to do is glue them onto the bases with superglue. I chose to do it after flocking and really push them into the grass.

Hopefully this helps you get your artillery teams looking the part on the table. You could also use this method for spent shells on mobile artillery engine decks!

Click on the image to the left for a much bigger version…

~Victor

Whiz-bang! It’s the 15cm Nebelwerfer Battery!

The last unit I have painted from my Panzerkampfgruppe German Starter Force box is the 15cm Nebelwerfer Battery with 3x 15cm Nebelwerfers. This is worth 9 points and is a capable unit, giving good artillery stats against non-armoured targets like guns and infantry, as well as providing a Smoke Bombardment.

To fit the 9 points of Nebelwerfers in a 100 points game I’ll look at either trading the 8.8cm Heavy AA Platoon (6 points), the Panzergrenadiers’ Panzerfausts (2 points), and the Lucky Card (1 point), or more fundamentally changing the structure of my force by removing the Tigers (24 points), retaining the 88s and Panzerfausts, and making up the points with another unit of 3x Panzer IVs (16 points).

So I better look at painting that extra platoon of Panzer IVs then!

~Wayne

All American, All Finished!

At the beginning of our Late-War Journey Wayne and I split a Hit The Beach box to give us extras to add to our Starter Army boxes. I’ve slowly been chipping away at the plastic Paratroopers and I can finally show them off!

I had a lot of fun painting these Paras, even though it took me a long time. I’ve accepted that my infantry painting speed is lacking but the end result makes me happy.

Since my American army is being planned to cover all of the Late-War period, I decided to go with the more green uniform introduced after Normandy. This means they’ll look at home for battles during Operation Market Garden, the Battle of the Bulge, and the push across the Elbe River. I used Vallejo US Dark Green and added Buff for highlights.

Painting the flag and unit patches was a fun challenge, but actually easier than I anticipated. I spent a while debating whether to go with ‘Screaming Eagles’ or ‘All American’. After polling the fine folks following us on our Instagram account, I went with the 82nd Airborne Division. The added bonus is that their patch uses the same colours as the flag on the opposite shoulder. I used Vallejo Deck Tan, Flat Red, and Dark Blue.

The basing was done using the plastic Rural bases, and a combination of Gamer Grass tufts, and GF9 Winter/Dead Static Grass.

With a basing style established I already have plans of doing an Armoured Rifle Company, but for now I need go paint something other than infantry to cleanse the palette.

~ Victor