In The Mood

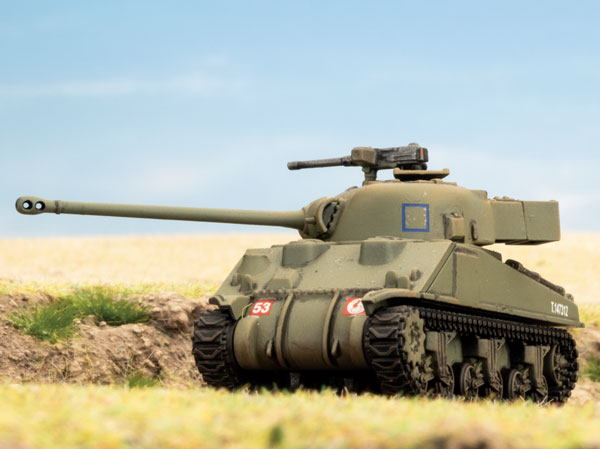
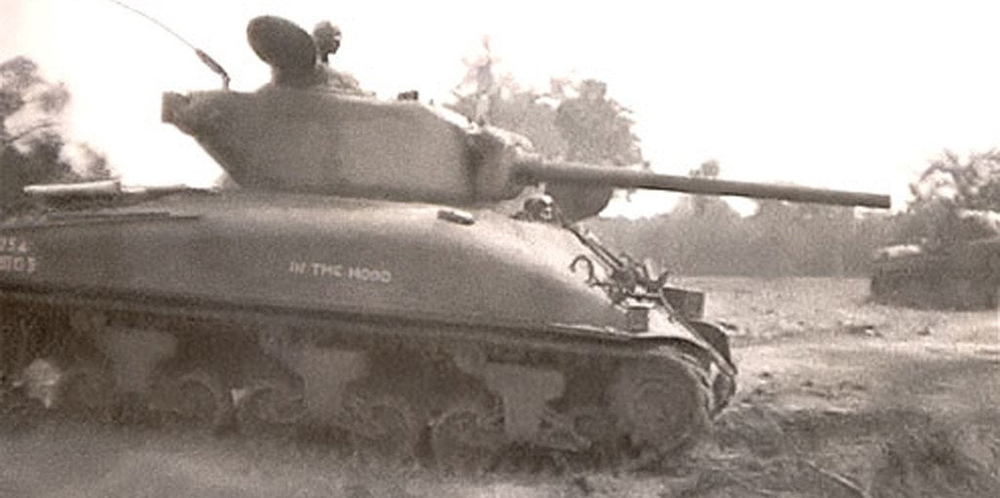
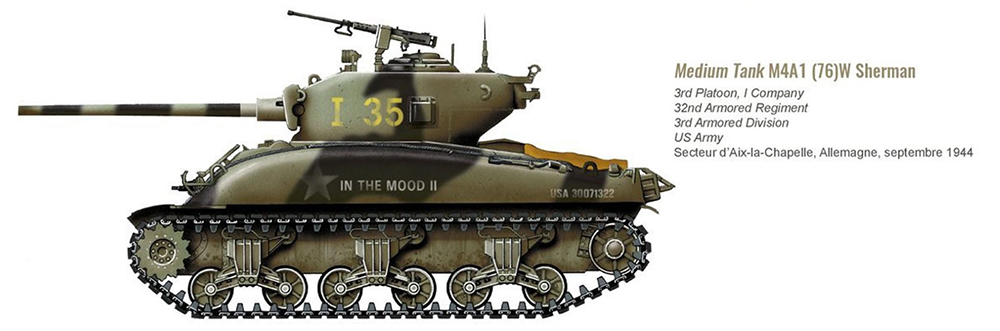
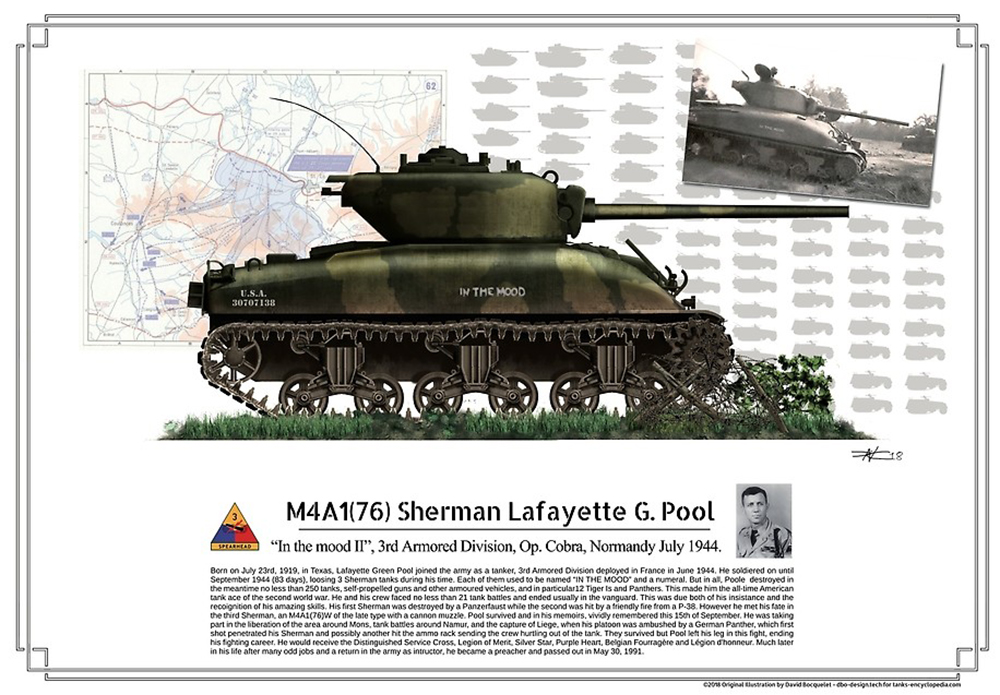
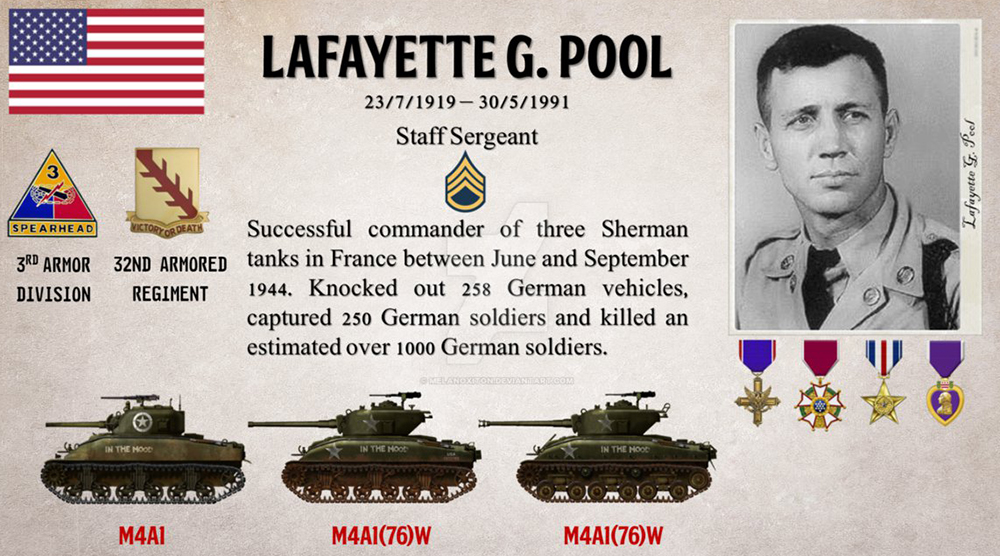
Previously I mentioned how I like to do a test model before I begin a large army. In this case I’ve chosen to do Lafayette Pool’s M4A1 76mm Sherman “In The Mood”, for a few reasons:

  • If I end up learning from it and changing the painting plan for the rest of the force, it’ll be ok that my warrior looks slightly different.
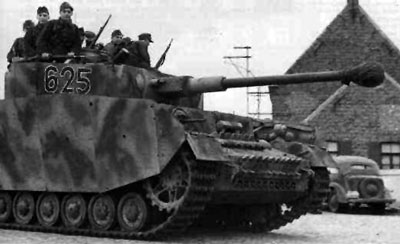
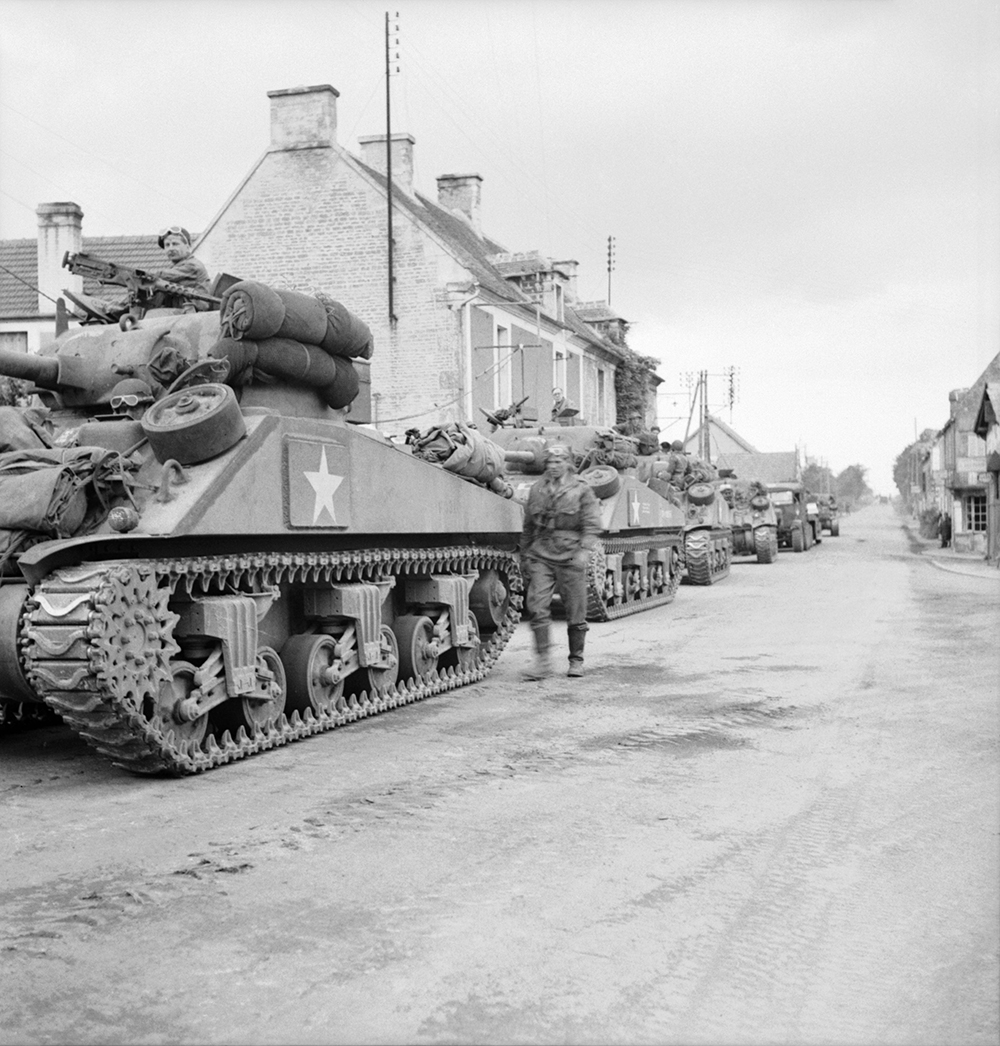
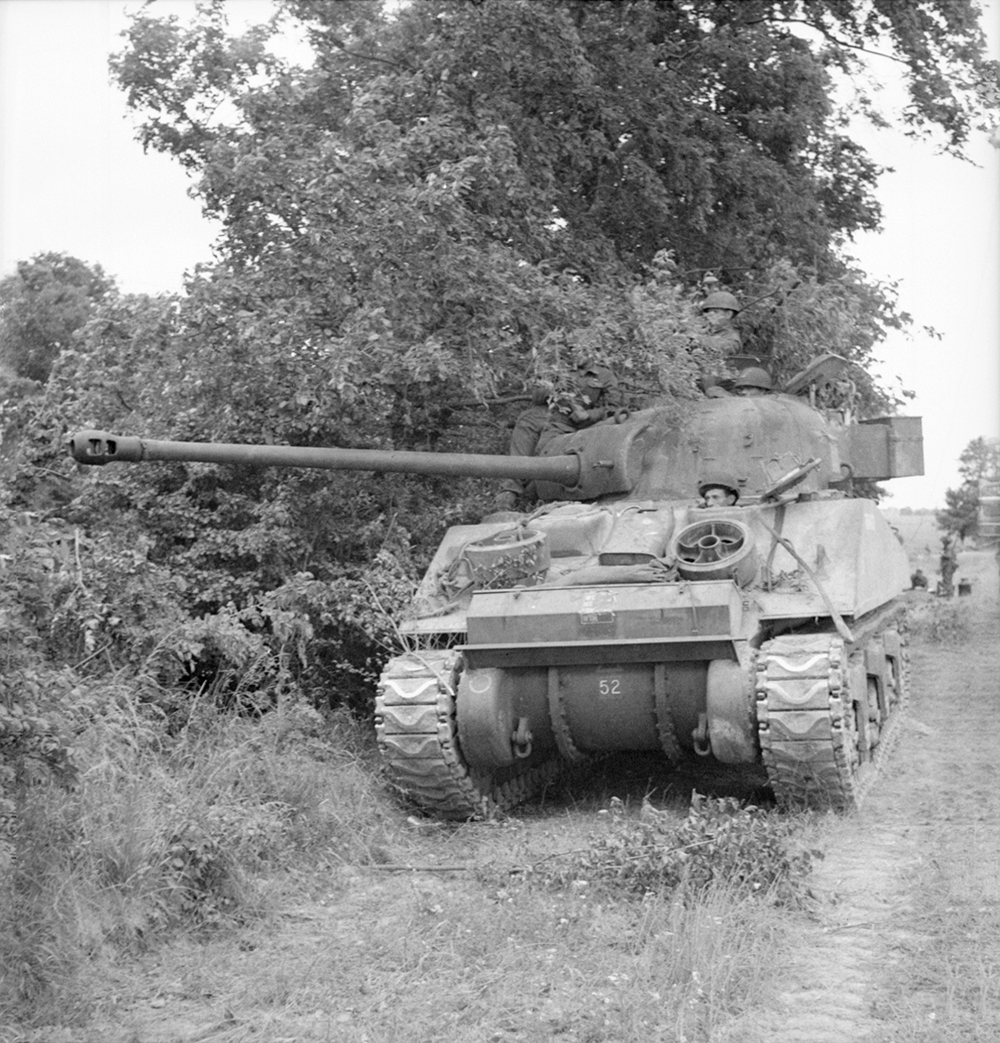
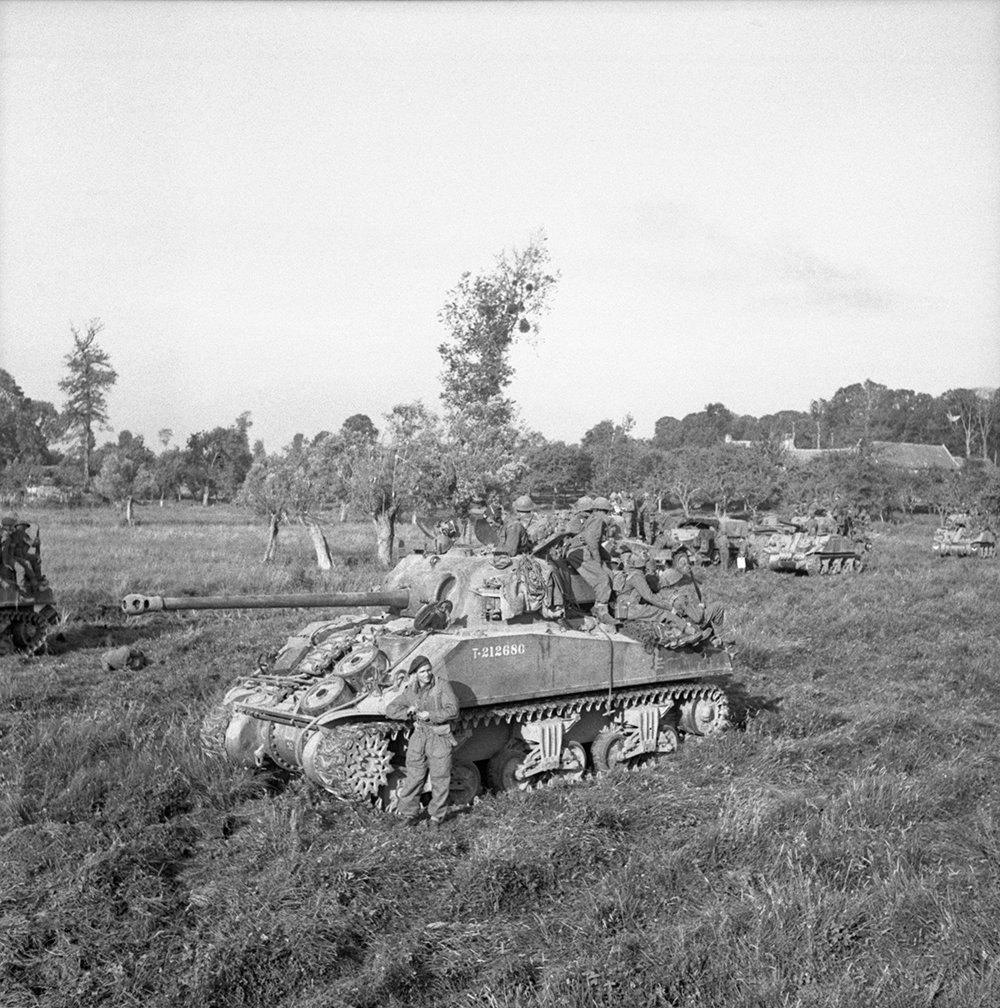
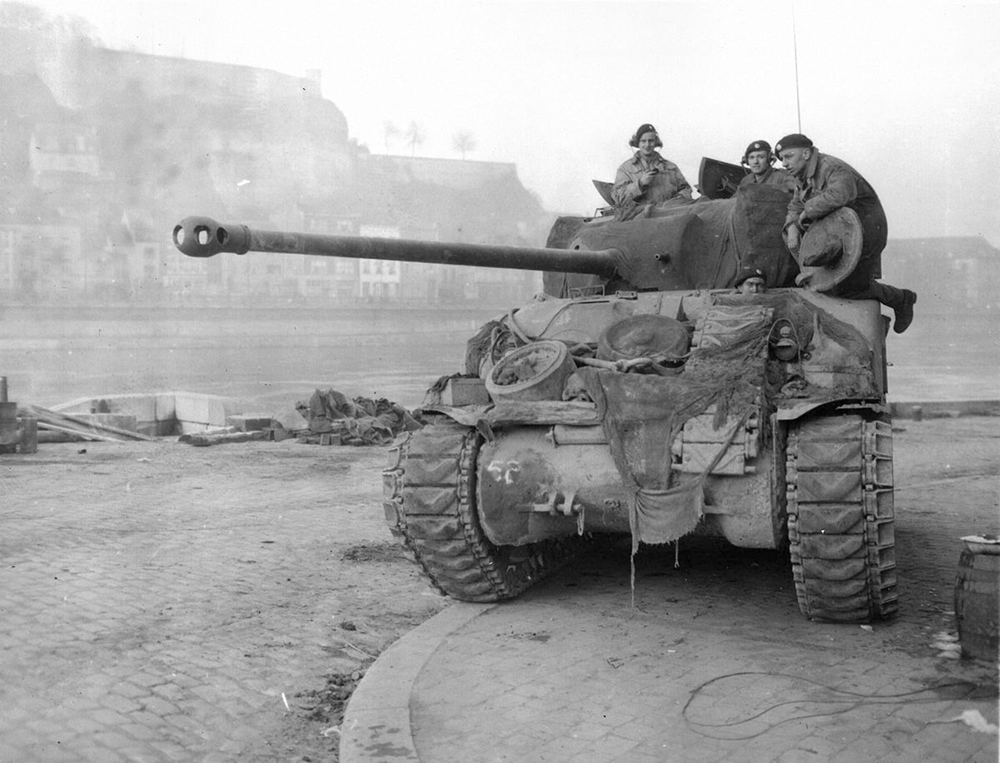
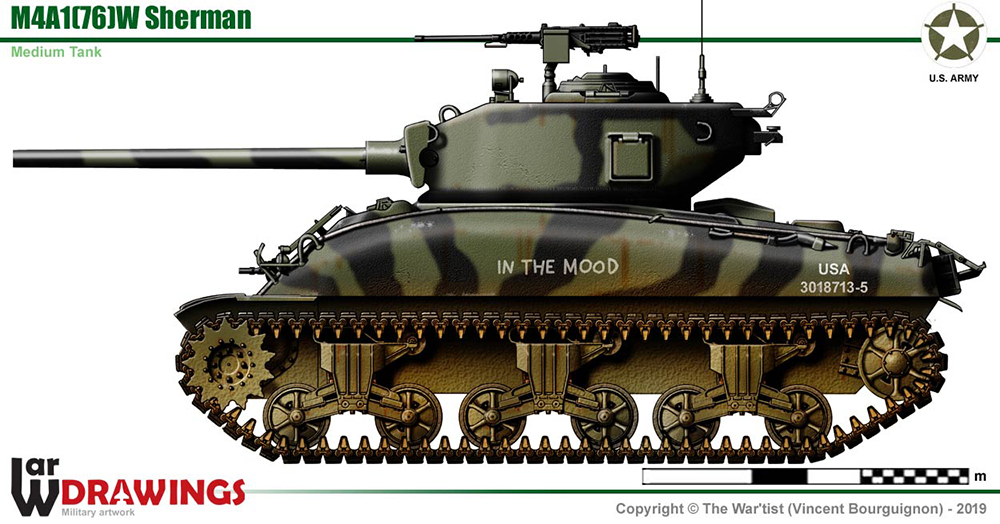
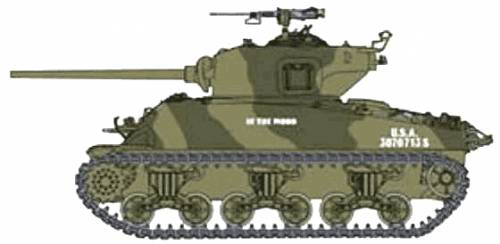
  • I want to try black camo on at least one tank, and Pool’s tank certainly has some camo.
  • I was eager to paint the new plastic kit!

With a project as big as this I felt it was worth completing a full model to completion, but sometimes a spare hull top is enough to try out colours.

I started as I usually do with a black primer, and then airbrushed on Brown Violet. Next, I added some Buff (about 75/25 Brown Violet/Buff) and airbrushed most of the upper surfaces, and then added even more Buff (about 50/50 now) and did some rough panel fading.

Switching from airbrush to brush, I dry brushed on German Camo Beige. This picked out all the raised edges and toned down some of my rough airbrushing. I then applied a very thinned down black wash, followed by a second dry brush of German Camo Beige to tidy up the wash.

Next it was time to try out the camo. The obvious choices would be to either airbrush on black for a soft-edged pattern, or brush on black for hard-edged.

From looking at photos and artists renderings of pool’s tanks, it seemed to me brushed on would be the best approach, as even though the real camo would have likely been sprayed on, from a distance and at our scale the edges would appear hard anyway.

I wanted a way to try retain some of the shading I had done with the olive drab colour. This was my eureka moment… Black wash!

I painted on patches of Black Wash, loosely copying some photos. This way my airbrush shading and dry brush shows through, and the tank looks like it’s highlighted consistently across the base colour and camo colour. I also liked that it gives a sort of faded look, and not a solid deep black, which is the impression I get from photos. It needed two coats to give me the contrast I was happy with, but the second coat goes quickly as I’d already traced out the pattern.

With the base and camo complete, it was time for details. I didn’t do anything too adventurous here; Beige Brown for tool handles, Gunmetal for tools and machine-guns, German Grey for rubber, etc. These all got a black wash as well.

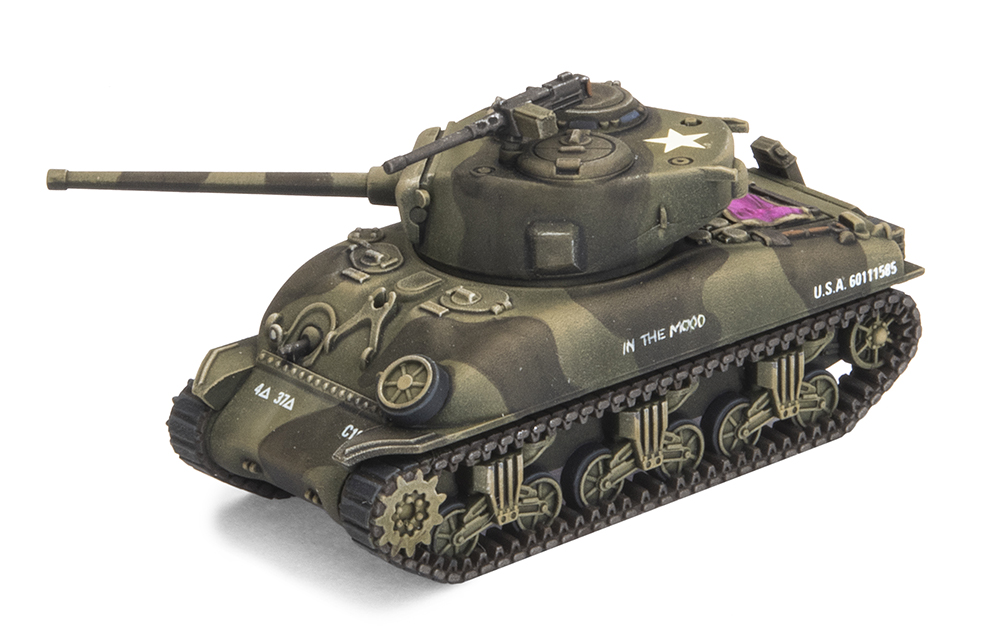
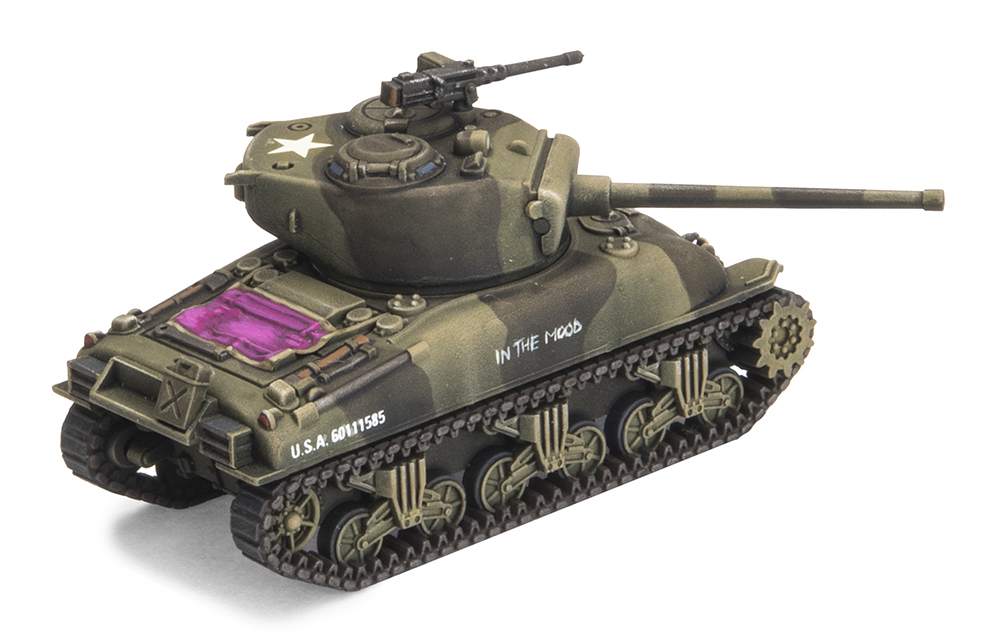
Lastly was decals, which I kept to a minimum this time as Pool’s tank seems to have been pretty bare. I had a go at writing “IN THE MOOD” on the sides of the tank, just as Pool would’ve done.

Oh, and you may have noticed the pink rectangle on the engine deck. More on that another time…

I’m really pleased with how this Sherman has turned out, and luckily, I don’t think I’ll need to change anything about the process going forward. It’s quick, easily repeatable, and I’m happy with the result, so it’s ticking all the boxes for me.

The only thing left to decide now is if I want to continue the black camo across the whole force. I certainly like the look, but I’d like to find out more about the application and how common it was.

Time to do some research…

– Victor
* All colours referenced are Vallejo Model Colour.

Starting a Soviet Army

One of the most exciting Soviet Formations to me is the Hero T-34 Battalion. It was one of those lists that I was quite excited about when it came out in Version 3, but never had the time to paint or play before, so I’m quite glad that it made it into Fortress Europe.

On a side note as a rabid soviet player I’m very happy with the lists in Fortress Europe. Since we Soviet players have to wait longest for our army books, we get access to a LOT more formations straight away in Fortress Europe as it has to last us longer that the other nations.

The other bonus about the list is that it is a reasonable sized force, aka not a hoard army like I usually paint, so hopefully it will be more achievable given that I’m planning on a more time-consuming paint scheme than just painting them green.

The obvious place to start is the new Soviet army deal as it is fantastic value, and a lot of the models that I need straight off the bat. The only models in the box that I’m not going to use straight off the bat in this army are the KV tanks, however I’m going to paint them up to support the infantry battalions that I already have painted.

I like taking large formations wherever possible. There is nothing worse than playing a game where you are about to win a game by taking an objective, only to have that victory snatched away because your formation is broken, despite having lots of support on the table.

Because of this, the core of the Force is a maxed-out Hero T-34 Tank Battalion of and HQ T-34 (76mm) and three Hero T-34 Companies of 2x T-34 (75mm) and 2x T-34 (85mm) tanks for a total of 13 tanks straight away.

It is worth mentioning that the T-34 (76mm) tanks are Overworked, making them add +1 to the score needed to hit when they move (basically like old school Hen & Chicks), however the T-34 (85mm) tanks don’t have this so can fire and manoeuvre much more effectively.

Another cool thing about the formation is that it can have integral infantry and mortars. I’ve added the Hero SMG Company at full strength because they are a useful unit to sit back on an objective to free the tanks up to do their job, or, if needed they can get into assault and make the most of their Assault 2+ stat.

Note, I’m going to cheat slightly with painting my army. In my time I’ve painted at least 7 full strength Soviet Rifle Companies, so for the sake of speed (and not wanting to paint even more Soviet infantry) I’m just going to use some infantry that I already have painted for my army. Luckily it is even based in a suitable theme already.

Even though I know the rest of the Big 4 aren’t really going to be taking infantry to start out, I’ve also added some mortars to my Formation. It’s another platoon in the formation to keep them in good spirits, and mortars are generally quite useful against more balanced forces.

With the formation sorted it is time to look at some support.

The army deal comes with 4 SU-85s, which is great because they will be one of the soviets go-to units from now on. They are quite expensive, coming in at slightly less than 6 points a vehicle, but they are Fearless, Veteran, and Careful, making them the best troops you have. They have average armour, but will require 6s to hit (Is Hit On 4+, +1 for range, +1 for concealed) when I use them to cover the advance of my T-34s.

No Soviet Army is complete without artillery. Again, you have lots of options, 76mm guns, 122mm howitzers, or Katyushas. I’ve added 4 Katyushas to my army because I already have plenty of anti-tank weapons and don’t really need any dual role weapons in the force, and that Salvo template will be devastating against any infantry that I face.

You’ll notice that I went with the T-34 (76mm) for the HQ, rather than the T-34 (85mm). The main reason for this is that the Soviets don’t have access to any observers, so I’m going to use my Battalion HQ as the observer. If he is observing he is not shooting, so any points used to upgrade him are wasted. Also, if he doesn’t have a big gun, I’ll be less tempted to use him in the wrong role. Also, using him as a dedicated observer means that I can hide my fragile rocket trucks out of sight.

The last unit in my force is the Hero T-70 Company. I’ve added this basically as a nuisance unit. It has a good enough gun that opponents can’t ignore it in case they get around the flanks. It’s not there to reliably take anything out, more to distract attention away from my main attack.

I’m also going to future proof my army by painting all the extra turrets for the T-34s, so that each hull has both a 76mm and 85mm turret, as inevitably later books will add options for hero units armed with all T-34 (85) tanks. It also means that with very little effort I’ll have a new Mid-war army at the same time as painting my new late War army.

~Casey

Selecting The Great Big Germans

It is with great honour I join the ranks of the Big Four for our journey into Late-War Flames Of War. As we’ve outlined in the Big Four Of Late War intro article each of us is making a force for Late-war from one of the Big Four nations in WW2. I’m building the German force.

I’ll be using Fortress Europe to make my initial list and the new German Starter Force Panzer Kampfgruppe to supply the core of my models. The German Starter Force Panzer Kampfgruppe is great value and gives you an excellent selection of tanks, guns and infantry. In fact I won’t be using them all immediately, but they will be used. The StuGs have already been earmarked for expanding my Mid-war Assault Gun Company so it can be fielded in Late-war.

I’ve decided to theme my army on 2. Panzerdivision in Normandy and base it around Panzer IV tanks. In the past I’ve concentrated on Panthers and StuGs, as well as other types of assault guns, so this will be the first Late-war Panzer IV Panzer Company I’ve ever made. So using the Panzer III & IV Mixed Tank Company in Fortress Europe (page 42) I will take:

Left over from the German Starter Army are three 15cm Nebelwerfer rocket launchers and three StuG assault guns. The StuGs will go towards my period straddling Assault Gun Company, while the Nebelwerfers will be painted to be used with this army as needed. You may have noted I have a total on 10 Panzer IV tanks, but the starter army only comes with five. For the additional models I’ve split a Hit the Beach with Victor, getting three more and I also had a box of five Panzer IV H tanks at home! My German share of Hit the Beach also gives me more Panzergrenadiers and 7.5cm PaK40 guns I can use later.

I have one point left to spend which I haven’t quite decided on. I’m sure a handy Command Card will fill the gap in the future.

~Wayne

Shermans, Shermans, and maybe a pinch more Shermans

With a plan firmly in place around some painting and modelling inspiration, it is now time to start thinking about the Army and what I will paint first. Like the rest of the Big Four I have grabbed one of the new Late War Starter Armies. With a great mix of models it can either be a complete legal army, or the foundation for one (or more).

My plan is to use it as the later – everything in the Army Deal has a place in my painting list, it is just the order that I am going to play around with. For Fortress Europe I have decided to base my Force around a Sherman Armored Squadron with as many Firefly tanks as I can fit in. That means a Squadron HQ of 2 Sherman (75mm) tanks, and 4 Troops, each containing 2 Sherman (75mm) tanks and 1 Firefly (17pdr). With 10 Sherman tanks that gives me plenty of Anti-tank 10 (which can deal with pesky T-34 and Panzer IV tanks) and high explosive rounds to knock out guns or infantry. The four Firefly tanks pack a massive wallop with Anti-tank 14 – that’s enough to punch through a Tiger or Panther. Best of all, it only comes in at 60 points.

Knowing that the other guys have plenty of armour in their forces it would be silly of me to not use the four M10 (17pdr) tank destroyers that is also in the Army Deal. These vehicles have the same gun as the Firefly, but I get four of them for only 18 points!

Painting infantry is certainly my least favourite part of the painting process, but I have been assured that the plastic British figures are both quick to paint and look really good so this is enough for me to add an under-strength Motor Platoon of 3 Bren Gun teams, a PIAT and 2-inch mortar. These will be hard-pressed to achieve much on the table, however it is a manageable figure count for me to punch out. At 6 points they are cheap and being Careful (Hit on 4+) if they hunker down they will stick around. Where there are infantry, there are Carriers… so I’ll be adding a Patrol of 3 – for 2 points they give me a cheap Scout and Spearhead unit.

Alternatively… 3 Stuarts is also 6 points (and coincidentally the number that come in the Army Deal) so I might knock these out initially as a good “test paint” platoon and then do the Motor Platoon later.

Rounding out the force is my battery of four 25 pdr guns. These are fantastic as they can lob HE rounds across the table knocking out dug-in troops (and guns) with ease, plus they have a handy AT rating of 9. Put them on an Objective, dig them in and they will defend it till they die thanks to their Fearless Motivation rating of 3+.

This leaves me with a few things left over from the Army Deal, mainly some extra infantry and Churchills. Assuming I get the understrength platoon painted, the remainder of the figures will be part of my second wave – painting the extra figures so that I have either 2 full-strength Motor Platoons, or 1 maxed out Rifle Platoon. Last, but not least, are the Churchill tanks. I have a plan for these, but it can wait a little while…

The Painting Plan: I don’t want to have to revisit things where possible so I am planning on doing some future proofing. I’ll start with the Stuarts as these are a tidy little platoon where I can knock out a small number of tanks in one go, testing out my paint colours and decal plan to make sure that the finished platoon looks good before tackling the rest. I should do a single test model but I’d rather just dive on in…

The Shermans will be my next port of call and I intend on doing some extras so that I can chop and change the list, as well as doing some extra Firefly tanks on the presumption that in later years we will get to add more. I also have some thoughts about decals and stowage, but more on this later…

Next on the shopping list will be the M10 tank destroyers, partially because they are great! And partially because the crew will give me a chance to experiment on painting infantry and gun crew, whilst still being able to hide any mistakes (since 90% of the figure is inside the turret).

The infantry and 25 pdr crews will probably be last on the painting list, simply because they will use similar colours and techniques and I enjoy painting tanks more than people.

Time to get building…

~Chris

A Good Plan Violently Executed…

My goal is to have many American unit options painted, but I want an initial 100 point list to work towards so I can start getting some games in.

I promptly grabbed the American Starter Force and I’ll use all of the models from it in my first list, except the Armoured Rifle Platoon (I’ll save them to do a full Armoured Rifle company eventually).

I also split a ‘Hit The Beach’ set with Wayne which gave me more Shermans and a Parachute Rifle Platoon to make use of later.

Between the starter force and ‘Hit The Beach‘ I’ve ended up with 13 Shermans, which gives me enough for a company with two platoons of five tanks, plus one spare to be a Sherman Observation Post for the Priests.

The last acquisition will be to steal a spare M5 Stuart sprue from Chris’s desk to take the starter force platoon from 3 to 4 tanks.

Since the American Starter force is designed for D-Day: American, I’ll be building the list from that book instead of Fortress Europe.

Veteran M4 Sherman Tank Company
HQ: 2x M4 Sherman (75mm) Tanks – 9 points

5x M4 Sherman (76mm) Tanks – 28 points
Command Card – Lafayette Poole – 4 points

5x M4 Sherman (75mm) Tanks – 21 points

4x M5 Stuart (37mm) Tanks – 10 points

4x M10 (3-inch) Tank Destroyers – 16 points

3x M7 Priest (105mm) Self-Propelled Artillery – 8 points

1x M4 Sherman OP (75mm) Tank – 3 points

Command Card – Lucky – 1 point

100 points

The advantages of using D-Day: American over Fortress Europe are:
– 76mm Shermans
– Veteran option (4+ to hit instead of 3+)
– Command Cards

I’ve included Lafayette Poole as I often like to use Warriors, and he’ll be a good test model to figure out my painting scheme. If I end up learning from it and changing the painting plan for the rest of the force, it’ll be ok that my warrior looks slightly different.

I feel this is a balanced tank list that gives me a solid foundation to build upon, and is also an achievable amount of models to get painted quickly. I plan to tackle painting one platoon at a time, starting with the 75mm Shermans, and the aim is to have the list painted in time for the release of D-Day American (approximately one platoon per week!).

Wish me luck!

~ Victor

Winter On The Eastern Front

With the volume of Soviets that I have painted, when looking through my collection I was surprised to see that I actually don’t have that many tanks painted, other than a whole battalion of metal and resin T-34/85s that I painted over 10 years ago.

And with all of the new plastics that have come out since I did my last Soviet tank army, I was actually quite keen to get back into painting the green horde…almost.

I’ve always wanted to paint a winter tank army and have started a couple of times in the past. I have an almost finished KV-1 tank battalion, that I was quite happy with when I painted it, however having gotten better with my painting now I’m not so happy with it. Another time, we did a 24-hour painting challenge and I tried to paint a winter American army, but was so disappointed with it that I ended up never finishing it.

So, third times a charm, this time and I’m going to take my time and paint a winter tank force that I’m happy with. As it so happens, the last Soviet infantry army I painted was my Shtraf Battalion (that happens to have a winter theme) and I am quite happy with how it turned out. So, I already have all of the infantry that I will need.

As you can see from my army list article, I’ve chosen a modest target of only 24 vehicles (29 if you include the KVs that I’m going to paint as infantry support). The theme of my army is a Hero T-34 Tank Battalion.

These days I like any army that paint to have a unique story. Historically the Soviet Army had a tendency to throw entire armies into battle until they were destroyed and then rebuilt them from scratch, but I want to tell a different story with my army.

My army contains a mix of T-34s (76mm) and T-34 (85mm) tanks. The story I want to tell is of a Hero T-34/85 unit that has been decimated, and then been brought up to strength with any old tanks that have been salvaged, scavenged, repaired, rebuilt and sent back to the front from wherever possible.

In order to achieve this, I’m going to build the T-34 (76mm) tanks without much consistency. They will have a mix of cupolas, fuel drums, and mudguards etc. I’ve also managed to scrounge up a few early turrets which I’m going to throw into the mix as well. I will also use this story to give the tanks different amounts of weathering, some will have fresher looking whitewash, while others may have whitewash that has almost completely worn off. The T-34 (85mm) tanks are going to be built fairly consistently.

Of course, I’m going to paint the 76mm turrets and 85mm turrets for all the tanks to give me more gaming options in the future. I’m going to keep the ad hoc theme running through the 76mm turrets if I ever field it as a mid-war army, but a later all T-34 (85mm) army will be a little more consistent.

To keep with the theme, I’m going to give all of the T-34 (85mm) tanks a consistent tank numbering style, but randomise the 76mm turret numbers and unit markings a bit. I’ve also ordered a selection of tank riders to further add to the ad-hoc nature of the formation, but I’ll probably use these to either help denote different companies, or make the command tanks stand out.

Since there are only 3 T-70s in the army I’m going to keep them similar—they are the remnants of a much larger company. The SU-85 tank killers however, are going to be a mix of SU-85 and SU-85M tank-killers, mainly because the sprue comes with both options, and add to the ad-hoc look that I’m going for.

Over the past few months I’ve been collecting images from other modellers of their winter tank schemes. Here is a selection of the photos that I’m going to use for my inspiration.

~Casey

Great Big “Germans”, or should I say Austrians.

For the theme of my Panzer IV Tank Company I could have gone with one of the obvious candidates such as Panzer Lehr Division, 21. Panzerdivision, or one of the Waffen-SS Panzer divisions. However, I wanted to go with a divisions with a bit more of a war spanning history, so I chose 2. Panzerdivision.

When the Germans started expanding their army in the 1930s in defiance of the Versailles Treaty, it created its first three panzer divisions (1., 2., and 3.). 2. Panzerdivision was formed in Barvaria in Southern Germany in 1935, but after the Anschluss (the German annexation of Austria) in 1938 it moved its home barracks to Vienna. From that point on Austrians made up much of the manpower of the division.

The division participated in the campaigns in Poland (1939) and France (1940) before it returned to Poland for occupation duties (1940–1941). It took part in the 1941 Balkans campaign in Greece before it was transferred to the Eastern Front in September 1941. The division fought with Army Group Centre, including the battles of Moscow in 1941 and Kursk in 1943.

In late 1943, 2. Panzerdivision was sent to France for refitting, rather than Vienna. One battalion of Panzer-Regiment 3 was equipped with Panther A tanks, while the other was equipped with Panzer IV H tanks. Following the D-Day landings, the division was moved to Normandy where it engaged the British 50th Infantry Division and the 7th Armoured Division. It took part with its last tanks in Operation Luttich, the German counterattack at Mortain. It was later encircled in the Falaise pocket, but broke out with heavy losses in materiel and troops.

For a more detailed account of the division’s campaign in Normandy see the Flames Of War website…

It was a rather well-equipped division when it entered combat in Normandy on 12 June. It even had two Armoured Panzergrenadier battalions, rather than the normal one for a Panzer Division.

2. Panzerdivision in Normandy
Commander: Generalleutnant Heinrich Freiherr von Lüttwitz
Chief of Staff: Oberstleutnant i.G. Rüdiger Weitz

Panzer-Regiment 3 (Oberst Traugott Köhn, killed on 20 July 1944, replaced by Major Schneider-Kostalski, killed on 7 August 1944, replaced by Oberstleutnant Carl von Wagner)
I./3 (Major Joachim von Lehsten) (79 Panther A tanks)
II./3 (Oberstleutnant Walter Koch, relieved by Major Horst Rämsch on 25 July) (96 Panzer IV H tanks)

Panzer-Grenadier-Regiment 2 (Oberst Karl Brassert) (one battalion in Sd Kfz 251 half-tracks, the other motorised)

Panzer-Grenadier-Regiment 304 (Major Dr. Anton Rauscher from July to August 1944, replaced by Oberstleutnant Christian Kübler) (one battalion in Sd Kfz 251 half-tracks, the other motorised)

Panzer-Artillerie-Regiment 74 (Oberstleutnant Karl-Heinz Finger) (12 Wespe, 6 Hummels, and 26 towed guns)

Panzer-Aufklärungs-Abteilung 2 (Major Bernhard von Schkopp)

Heeres-Flak-Artillerie-Abteilung 273 (eight 8.8cm FlaK36 guns)

Panzerjäger-Abteilung 38 (Major Werner Sterz) (21 Jagdpanzer IV, plus nine 7.5cm PaK40 guns, the division had a total of 25 Pak40, the other 16 were with the panzergrenadiers and the Panzer-Aufklärungs-Abteilung)

Panzer-Pionier-Bataillon 38

Also attached to the division was 4. Kompanie of Panzer-Abteilung 301 (Funklenk) (a radio controlled demolition carrier unit armed with two Panzer III, six StuG, and 36 Bogward B IV demolition carriers).

All this equipment means I’ll have plenty of opportunities to expand my force in the future.

Nailing down the look and feel
There are lots of photos of Panzer IVs in Normandy taken during and after the campaign, however it is often hard to pin down what unit they belong to. However, tank nerds abound and usually someone else has usually identified what unit a tank belongs to. My initial quick bit of research has identify a few Panzer IV tanks as belonging to II./Panzer-Regiment 3, of 2. Panzerdivision.

As you can see the scheme is rather busy, but I think I can tone it down a bit to something like this modellers interpretation, or like in this artwork from Tank encyclopaedia.

The Panzergrenadiers’ half-tracks may be more of an issue, but I’m sure I can find something simple, yet striking I can model their camouflage scheme on.

~ Wayne

Sherman Tanks: Advance!

Motivation and Skill are two of the most important stats in Flames Of War, determining how keen your troops are to do scary things, and how good they are at doing them. Selecting a Nation and an Army for the Big Four Project (for me at least) tapped in to the same two things…

Motivation: what drives us to do something. In the case of the Big Four we all wanted to go on the Late War Journey as a group of friends, whilst sharing it with a community of (hopefully) interested Flames Of War players. Drilling down further we see that:

  • Victor: wants to build a great looking, visually thematic American force that he can plug in new units into.
  • Casey: also wants a visually themed force, but one that challenges his ability (Skill) but working on a different painting style.
  • Wayne: is planning a historically themed force that fought throughout Late War.
  • Chris: well….

I am drawing on a few different areas, TV and Movies, Gaming, and a desire to finish a project that I have failed to complete previously…

TV, Movies and the Internet – if you haven’t watched A Bridge Too Far, then go to your favourite streaming service or movie rental and watch it… now!

Obviously ABTF isn’t the only reference that I am drawing from but there is just something about that movie and its portrayal of not just the Paras, but also the Irish Guards and their columns of Sherman tanks pushing up the road to Arnhem that has really stuck with me.

Then, just do a search on the internet for images of the British army in Normandy – from images of troops fighting in the hedgerows to Shermans covered in stowage and track links, there is plenty to draw inspiration from.

Gaming – I enjoy playing the mix of models that a British Army can run in Late War – middle of the road Sherman tanks, very shooty Firefly tanks, resilient Rifle Platoons, nippy (fast) Carriers, all rounders like the 25pdr gun, and heavily armoured Churchills. There is something for everyone, and in a game where you can field a good mix of models this means I am not short of options in my Army Building Toolbox. A balanced force can deal with anything…

Finishing Something – I’ve started British forces three times since I started at Battlefront… a Cromwell Company not long after I started, inspired by the individually sculpted resin models that Jeremy and James built and painted. A British Guards Sherman Company when we were working on the Bridge Too Far Firestorm Campaign – a terrible paint job left me too grumpy to complete the project. The final false start was my Comet Company, still sitting in a box, assembled and ready for painting, relegated to a box in the garage. Spoiler Alert – year four of the Journey it will be coming back to the painting table!

This brings me to Skill – I am the least capable painter/hobbyist of the group. I am handy with a paintbrush but my painting ability is not what brings me to the hobby. However, I have a plan here as I work alongside some pretty clever guys. I will be picking their brains to come up with a painting plan that means I can complete a nice looking (hopefully) tabletop army using some of the tips and tricks from Colours Of War, along with a few of the skills I have picked up along the way.

On the good side, British vehicles can have a lot of colourful markings on them and there is nothing like a pile of decals and a couple of interesting pieces of stowage to really help finish off a tank and make it look good.

Where I am backing myself is the gaming side of things. I feel like I have a very solid list to build initially that will let me dish out some hurt on the tabletop. Casey, Wayne and Victor’s tanks will all burn the same colour after my Firefly tanks brew them up…

So with the Late War Journey just beginning I feel like have the basis of solid plan put together – time to sort out an initial painting list and get it assembled.

~ Chris

Breaking Out With Americans

When we started work on V4 Late-War, I began thinking of all the new armies I could build. There’s so many exciting options but I wanted to find something new that I hadn’t painted before. It wasn’t until I was halfway through working on D-Day: American that I realised: I’ve never made an American army!

I’d always liked the idea of an American Sherman army, and the tank itself is really iconic. I guess I normally trend towards heavy tanks as it means less painting, so I came up with the “Big Four of Late War” journey as a way to push myself out of my usual habits. Then it was just a matter of finding three suckers to join me to make the name work…

Some people might find the idea of painting a horde of Olive Drab tanks a bit dull and… drab… but I see it as something I can turn into a positive! My goal for this journey we’re embarking on is to have an American force that is all cohesive in the way it looks, so that I’m able to swap in and out units to build any American list I want.

All of my previous Flames Of War armies over the past 10 years have been based around a very specific battle or division (Market Garden FJ, Welsh Guards Cromwells, Late T-34’s in Berlin, to name a few) which meant once the army was complete, it remained as is without any list building flexibility. They also often had advanced painting techniques used and specific camo schemes or markings that while they were fun and satisfying to do, were often hard to repeat on a new unit (especially months later if I hadn’t written my process down!).

With my new Late-War Americans I want to figure out painting steps that are easily repeatable, so I can add units to change up my lists and grow my collection as we progress through the war. I’m much more a painter than a gamer though, so it has to be something I’ll be happy with and proud of.

This lead me to think about camouflage options for American AFV. I had seen black camo patches over olive drab before, but hadn’t ever looked into how common it was. So I plan to do a bit of research on it to educate myself, and see if it’s viable for a full army.


In any case it’s something I want to try painting, at least on one tank.

As with most of my army projects, I do a test piece to try out colours and techniques before committing to the full army. Sometimes it’s a spare hull top from a previously completed kit, but this time I want to finish a full tank to work out the painting steps from start to finish. Then I can judge it and see if there’s anything I’d do differently for the full force.

So stay tuned to see my first experiment…

~Victor

Who Are The Big Four?

Four Nations. Four People. Four Army Deals. Welcome to the Big Four Of Late War…

Victor “el Presidente” Pesch is the ring leader of Big Four, having come up with the entire concept of embarking on the Journey alongside our players. Known in the Studio for his painting prowess he spends his days wrangling Photoshop and InDesign working as a Graphic Designer, whilst his nights are spent working on whatever new project takes his fancy. He has his eyes set on an American force filled with Sherman tanks. For now…

Wayne “the Veteran” Turner is one of the longest serving employees in the company, having worked in almost every department of the company from Game Design to Production. These days he finds himself primarily working on Team Yankee, but a return to Late War has him excited to return to World War II and the chance to build his first Panzer IV based German army.

Casey “Comrade” Davies has built more Soviet models than anyone can count, with an astounding seven complete Strelkovy Companies to his name. After some debate he grabbed the new Soviet Army Deal whilst making noises about wanting to try his hand at building a new Hero Company. Like Victor he spends his days creating the books, cards and imagery that you see whenever you play a game of Flames Of War (or Team Yankee).

Chris “The Magpie” Townley is always looking forward to the next project, even before he has finished whatever is currently sitting on the painting table. He spends his time pouring over spreadsheets and planning documents, all the while looking over the writers shoulders trying to noodle his “next big project”. For Chris, the Late War Journey is a chance to finally build that British Sherman company that he has been planning for almost 10 years…

To follow their individual progress you can click on the handy icons over on the right hand menu, as well as checking out the groups Instagram feed to see plenty of behind-the-scenes activity. Over the next few years there will also be plenty of great content coming from the rest of the Battlefront family so don’t forget to keep an eye on the Flames Of War website for this, as well as all the latest news and information on what is happening.

~The Big Four Of Late War